Pear Blossom Press: Rudolph Lights Up Postage Stamps


Hello Crafty Friends! I'm on the Pear Blossom Press Blog today. I am so excited to share with you my very first post as a new Blog Design Team member. 


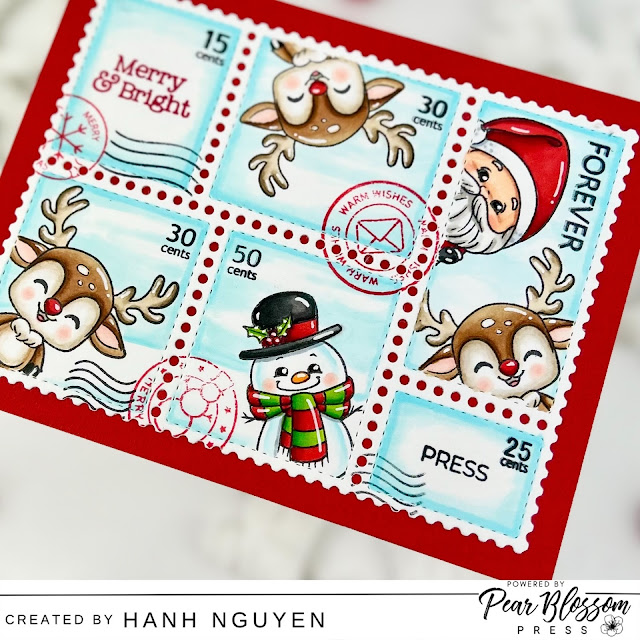
Merry & Bright! For my first card, I have a fun postage collage light up card to share with you featuring these adorable images from the Sweet November Stamps Christmas Minis. Rudolph is prancing around with excitement and testing out his bright and shiny red nose because Christmas is almost here! My card design was inspired by a beautiful card posted recently by the amazing illustrator of this stamp set, Amy Young @amyyoungforever. I have used the Waffle Flower Crafts Postage Collage Die and a variety of coordinating stamp sets as well as the Pear Blossom Press EZ-Light to create this card.

This light really lives up to its name of being easy. There are 3 lights attached to a battery unit by wires. The wires are the key here in that it allows you so much freedom for the light placement. There's no need to have it right next to the battery unit and press button. I love it!

SUPPLIES:
Christmas Minis - Sweet November Stamps
Signs of the Season - Sweet November Stamps
Postage Collage Die - Waffle Flower Crafts
Postage Collage Stamps - Waffle Flower Crafts
Postage Collage Fall Stamps - Waffle Flower Crafts
Postage Collage Love Stamps - Waffle Flower Crafts
Postage Collage North Pole Stamps - Waffle Flower Crafts

CARD INSTRUCTIONS:
I used the Waffle Flower Postage Collage Die to diecut a postage collage panel out of Neenah Solar White 110 lb cardstock. I used Post-It notes to mask off the edges of the stamps. I used a MISTI stamping tool to stamp the images from the SNS Christmas Minis Stamp set onto each of the stamps with Memento Tuxedo Black ink. While I had the reindeer stamp in place, I swapped out my postage collage panel for a piece of red cardstock (4.25" x 5.5") which I will use later as a mat behind the postage panel. I only inked up the reindeer's nose and stamped onto the red cardstock. I repeated this process with each of the reindeer image. This allowed me to locate the reindeer's nose for the placement of the lights.


I stamped the word "PRESS" from the PB Press Stamps and Die Bundle with the same black ink. I stamped the "Merry & Bright" from the SNS Signs of the Season with Versafine Red Satin ink. 

I colored the images with Copic markers and accented with a white gel pen.

COPIC COLORS:
Rudolph: E31/34/35/37, E40/41/42, E41/42/43/44, R00/30, W3, R22, R24/29, T3/5
Santa: E000/00/11/93, W1/3
Santa's Clothing/Hat: R24/27/29/39, C0/1/3, T5/7/9
Snowman: B0000/000, Y38 YR04, R30, 
Snowman's Clothing/ Hat: T3/5/7/9, YG03/25/17, R24/27/29
Sky: B0000/000

I used a combination of the Waffle Flower Postage Collage Stamps, Postage Collage Fall Stamps, Postage Collage North Pole Stamps and Postage Collage Love Stamps to stamp the stamp value and cancellation marks with the same red and black ink as above.

For the lights, I used a small hole puncher to punch a hole in the center of each of the reindeer nose on the red cardstock panel. I held postage panel in front of the red panel in front of a light to make sure that I had aligned the reindeer nose correctly over the holes on the red panel before I adhered the two panels together. Next, I prepared my Pear Blossom Press EZ Light by placing the coin battery into the battery unit. Then I lined up the three lights from the with the holes on the backside of the red panel and secured them in place with some Scotch tape. Next, I aligned the battery unit behind the word "PRESS" on my postage panel and secured it to the panel with tape. I tested the lights out to make sure everything worked and was aligned properly.


In order to create room for the battery unit on the backside of my red panel, I adhered some Pear Blossom Press World's Best Foam Tape to the panel. Oh my goodness! Have you tried this foam tape??? This was my first time using it. What a game changer! This foam tape is absolutely AMAZING! It allows you 30 minute working time during which you can adhere, remove and re-adhere the foam tape as many times as you want and it does not tear up the cardstock! It slowly becomes permanent in 24 hours. It's magic! Pure magic! No wonder it's called World's Best Foam Tape!

Finally, I removed all of the release paper from the foam tape and adhered the panel to a white card base (4.25" x 5.5").


I appreciate you taking the time to stop by and visit today. I hope you liked my card. Wishing you a Merry & Bright Christmas!

Hanh

**Affilitate Links are used when available at NO EXTRA COST to you! I make a small commission if you click my links to shop. Thank you so much for your support!**

Comments